Homeowners Checklist – How to Make Your Home Fire Safe

OUTSIDE:

  1. Design / Construction
    – Use ignition resistant construction for roofs/ roof assemblies, gutters, vents, decks, exterior walls, exterior windows
    – Enclose the underside of eaves, balconies, and aboveground decks with fire resistant materials
    – Show your 100 feet Defensible Space on plot plan
    – Build your home away from ridge tops, canyons, and areas between high points on a ridge
    – Consider installing residential sprinklers
    – Make sure that electric service lines, fuse boxes, and circuit breaker panels are installed and maintained per code
    – Contact qualified individuals to perform electrical maintenance and repairs
  2. Access
    – Make sure that your street name sign is visibly posted at each street intersection
    – Post your house address so it is easily visible from the street, especially at night
    – Address numbers should be at least 3 inches tall and on a contrasting background
    – Identify at least two exit routes form your neighborhood
    – Clear flammable vegetation at least 10 feet from roads and five feet form driveways
    -Cut back overhanding tree branches above access roads
    – Construct roads that allow two-way traffic
    -Make sure dead-end roads, and long drive ways have turn-around areas wide enough for emergency vehicles
    – Design bridges to carry heavy emergency vehicles
    – Post clear road signs to show traffic restrictions such as dead-end roads, and weight and height limitations
  3. Roof
    – Install a fire resistant roof. Contact your local fire department for current roofing requirements.
    – Remove dead leaves and needles from your roof and gutters.
    – Remove dead branches overhanging your roof and keep branches 10 feet from your chimney.
    – Cover your chimney outlet and stovepipe with an nonflammable screen of 1/2 inch or smaller mesh
  4. Landscape
    – Create a Defensible Space of 100 feet around your home. It is required by law
    – Create a “LEAN, CLEAN, AND GREEN ZONE” by removing all flammable vegetation within 30 feet immediately surrounding your home
    – Then create a “REDUCED FUEL ZONE” in the remaining 70 feet or to your property line
    – You have two options in this area:
    a) Create horizontal and vertical spacing between plants. The amount of space will depend on how steep your property is and the size of your plants.
    b) Large trees do not have to be removed as long as all the plants beneath them are removed.
    – Remove lower tree branches at least six feet from the ground
    – Landscape with fire resistant plants
    – Maintain all plants with regular water, and keep dead branches, leaves, and needles removed.
    – Wen clearing vegetation, use care when operating equipment such as lawnmowers. One small spark may start a fire; a string trimmer is much safer.
  5. Yard
    – Stack woodpiles at least 30 feet from all structures and remove vegetation within 10 feet of woodpiles
    – Locate LPG tanks (butane and propane) at least 30 feet from any structure and maintain 10 feet of clearance
    – Remove all stacks of construction materials, pine needles, leaves and other debris form your yard
    – Contact your local fire department to see if debris burning is allowed in your area; If so, obtain a burning permit and follow all local air quality restrictions
  6. Emergency Water Supply
    – Maintain an emergency water supply that meets fire department standards through one of the following
    a) a community water/hydrant system
    b) a cooperative emergency storage tank with neighbors
    c) a minimum storage supply of 2,500 gallons on your property (like a pond or pool)
    – Clearly mark all emergency water sources
    – Create easy firefighter access to your closest emergency water source
    – If your water comes from a well, consider an emergency generator to operate the pump during a power failure

Posted in: Around the District, Community, Customer Information, Fire, Uncategorized

Leave a Comment (0) →

Homeowners Checklist – How to Make your Home Fire Safe

INSIDE:

  1. Kitchen
    – Keep a working fire extinguisher in the kitchen
    – Maintain electric and gas stoves in good operating condition
    – Keep baking soda on hand to extinguish stove-top grease fires
    – Turn the handles of pots and pans away from the front of the stove
    – Install curtains and towel holders away from stoveburners
    – Store matches and lighters out of reach of children
    – Make sure that electrical outlets are designed to handle appliance loads
  2. Living Room
    – Install a screen in front of fireplace or wood stove
    – Store the ashes from your fireplace (and barbecue) in a metal container and dispose of only when cold
    – Clean fireplace chimneys and flues at leas once a year
  3. Hallway
    – Install smoke detectors between living and sleeping areas
    – Test smoke detectors monthly and replace batteries twice a year, when clocks are changed in the spring and fall
    – Replace electrical cords that do not work properly, have loose connections, or are frayed
  4. Bedroom
    – If you sleep with the door closed, install a smoke detector in the bedroom
    – Turn off electric blankets and other electrical appliances when not in use
    – Do not smoke in bed
    – If you have security bards on your windows or doors, be sure they have an approved quick release mechanism so you and your family can get out in the event of a fire
  5. Bathroom
    – Disconnect appliances such as curling irons and hair dryers when done; store in a safe location until cool
    – Keep items such as towels away from wall and floor heaters
  6. Garage
    – Mount a working fire extinguisher in the garage
    – Have tools such as a shovel, hoe, rake, and bucket available for use in a wildfire emergency
    – Install a solid door with self-closing hinges between living areas and the garage
    – Dispose of oily rags in Underwriters Laboratories approved metal containers
    – Store all combustibles away from ignition sources such as water heaters
    – Disconnect electrical tools and appliances when not in use
    – Allow hot tools such as glue guns and soldering irons to cool before storing
    – Properly store flammable liquids in approved containers and away from ignition sources such as pilot lights

    *Disaster Preparedness*
    – Maintain at least a three-day supply of drinking water, and food that does not require refrigeration and generally does not need cooking
    – Maintain a portable radio, flashlight, emergency cooking equipment, lanterns and batteries
    – Outdoor cooking appliances such as barbecues should never be taken indoors for use as heaters
    – Maintain first aid supplies to treat the injured until help arrives
    – Keep a list of valuables to take with you in an emergency; if possible, store these valuables together
    – For safety, securely attach all water heaters and furniture such as cabinets and bookshelves to walls
    – Have a contingency plan to enable family members to contact each other. Establish a family/friend phone tree
    – Designate an emergency meeting place outside your home
    – Practice emergency exit drills in the house (EDITH) regularly
    – Make sure that all family members understand how to STOP, DROP, AND ROLL if their clothes should catch fire

Posted in: Around the District, Community, Customer Information, Fire, From the Office, Uncategorized, Upcycling

Leave a Comment (0) →

Water Facts

  • Water is made up of two elements, hydrogen and oxygen. Its chemical formula is H2O
  • Each molecule of water is made up of two hydrogen atoms bonded to a single oxygen atom.
  • The existence of water is essential for life on Earth.
  • Water has three different states: liquid, solid, and gas
  • The word water usually refers to water in its liquid state. The solid state of water is known as ice while the gas state of water is known as steam or water vapor.
  • Water covers around 70% of the Earth’s surface.
  • The three largest oceans on Earth are the Pacific Ocean, the Atlantic Ocean, and the Indian Ocean.
  • Found in the Pacific Ocean, the Mariana Trench is the deepest known point in the world’s oceans.
  • Ocean tides are caused by the rotation of the Earth and the gravitational pull of the Moon and Sun acting on ocean water.
  • Water from a sea or ocean is known as seawater. On average, every kilogram of seawater contains around 35 grams of dissolved salt.
  • The freezing point of water lowers as the amount of salt dissolved in at increases. With average levels of salt, seawater freezes at -2 degrees Celsius.
  • The longest river in the world is the Nile River. It reaches 6650 kilometers in length (4132 miles)
  • The second longest river in the world is the Amazon River. It reaches 6400 kilometers (4000 miles in length).
  • The longest river in the USA is the Missouri River. At around2,340 miles in length it is slightly longer than the Mississippi River. The two combine to form the longest river system in North America.
  • Water makes a good solvent with many sugar, salts, and acids easily dissolving in it. On the other hand oils and fats don’t mix well with water.
  • The water cycle involves water evaporating (turning into a gas), rising to the sky, cooling and condensing into tiny drips of water or ice crystals that we see as clouds, falling back to Earth as rain, snow, or hail before evaporating again and continuing the cycle.
  • Water in the form of ice is found at the polar ice caps of the planet Mars, some scientists have also suggested the possibility of liquid water on the red planet.
  • Pure water has no smell and no taste, it also has a pH level around 7.
  • While most people know that water boils at 100 degrees Celsius, this is at the normal conditions of sea level. The boiling point of water actually changes relative to the barometric pressure. For example, water boils at just 68 degrees Celsius on the top of Mount Everest while water deep in the ocean near geothermal vents can remain in liquid form at temperatures much higher than 100 degrees Celsius.
  • Water expands as it cools from 4 degrees Celsius to 0 degrees Celsius. In freezing conditions, water has been known to burst water pipes as it freezes to ice.
  • Water can move up narrow tubes against the force of gravity in what is known as capillary action.
  • Most people around the world have access to clean drinking water but it is a major problem in poorer areas of the world. Water pollution and low quality water can lead to dangerous bacteria, disease, and viruses such as E coli and Cryptosporidium.
  • Drinking water is needed for humans to avoid dehydration, the amount you need each day depends on the temperature, how much activity you are involved in and other factors.
  • An important use for water is in agricultural irrigation, this is when water is artificially added to soil in order to assist the growth of crops.
  • Water is used frequently by firefighters to extinguish fires. Helicopters sometimes drip large amount of water on wildfires and bushfires to stop fires spreading and limit the damage they can cause.
  • The water industry helps deliver water to home in various cities and countries around the world . This can involve services such as purification, sewage treatment, filtering, distillation, and plumbing.
  • Electricity can be created from hydropower, a process that uses water to drive water turbines connected to generators. There are many hydroelectric power stations around the world.
  • Water also plays a role in cooking. Steaming and boiling food are well known cooking methods. You may have notices this last time you made pasta or noodles.
  • Water is also used for fun. Water sports are a very popular recreational activity and include things like swimming, surfing, and waterskiing. Ice and snow is also used in ice skating, ice hockey, skiing, and snowboarding.

Posted in: Around the District, Community, Conservation, Customer Information, From the Office, Leaks, Pine Cove Water District, Uncategorized, Water Conservation

Leave a Comment (0) →

Wildfire Actions

What to do BEFORE a wildland fire:

  • Create defensible space to separate your home from flammable vegetation and materials.
  • Adhere to all local fire and building codes and weed abatement ordinances.
  • Keep all trees and shrub limbs trimmed so they do not come into contact with electrical wires or overhand your chimney. (Do not trim around live power lines yourself, call a professional)
  • Prune all lower branches 8 feet from the ground.
  • Keep trees adjacent to buildings free of dead or dying branches.
  • Stack firewood away from your home and other buildings (Keep clearance around your piles)
  • Keep roof surfaces clear of pine needles, leaves and debris at all times.
  • Install spark arresters for each chimney
  • Clean chimneys and check the maintain spark arresters twice a year.
  • Keep rain gutters clear of debris at all times.
  • Use approved fire resistant materials when building, renovating, or retrofitting structures.
  • Install electrical lines underground if possible.
  • Be sure your house numbers show clearly from the street, both day and night.
  • Store combustible or flammable materials in approved containers.
  • Store all important papers in a fireproof container or keep copies at another location.
  • Make evacuation plans with family members. Include several options with an outside meeting place and contact person. Practice regularly.
  • Keep battery operated radios and flashlights with additional fresh batteries on hand.

What to do DURING a wildland fire:

  • Turn on a battery operated radio to get latest emergency information.
  • If you have a ladder, prop it against the house so you and firefighters have access to roof.
  • If hoses and adequate water are available set them up. Fill buckets with water.
  • Remove combustible materials form the area surrounding your house.
  • Turn a light on in each room for visibility in case of smoke.
  • Close all doors and windows, but do not lock them.
  • Open or take down flammable drape and curtains.
  • Close all venetian blinds and non-flammable window coverings.
  • Move upholstered furniture away from windows and sliding glass doors.
  • Be ready to evacuate all family members and pets when requested to do so.
  • Turn off air conditioning/ air circulation systems.
  • Detach electrical garage doors. Back in your car and leave the keys in the ignition.
  • Secure your pets if possible.

What to do AFTER a wildland fire:

  • Check with fire officials before attempting to return to your home.
  • Use caution when re-entering a burned area – flare-ups can occur.
  • Check grounds for hot spots smoldering stumps and vegetation. Use your buckets of water.
  • Check the roof and exterior areas for sparks and embers.
  • Check the attic and throughout the house for hidden burning sparks and embers.
  • Continue to check for problem areas for several days.
  • Contact 911 if any danger is perceived.
  • If burning outside your home was extensive, watch for soil erosion.
  • Consult local experts on the best way to restore and replant your land with fire safe landscaping.

Posted in: Around the District, Community, Customer Information, Fire, Fire Danger, From the Office, Pine Cove Water District, Uncategorized

Leave a Comment (0) →

Be a Leak Seeker

Leaks: Unseen or unfixed, they can drip hundreds, even thousands, of gallons of water wastefully down the drain. A little detective work several times a year can catch these water thieves in the act and put them out of circulation.

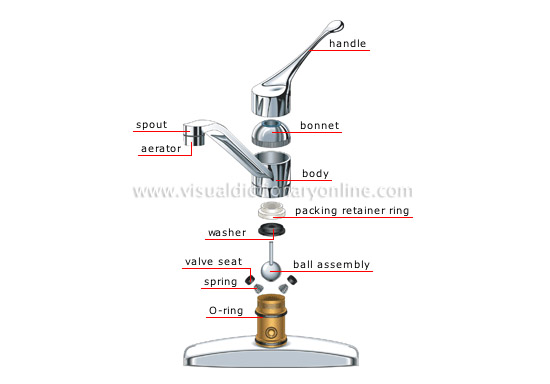
Faucets: Most leaks result from worn washers in household faucets and showerheads. These faucets, as well as seldom-used taps in the basement or storage rooms, should be checked periodically. Faucet leaks are usually caused by worn washers or “O” rings (for washer less faucets). Repairing faucet leaks is easy. All you have to do is turn off the water supply line to that faucet, replace the washer and turn on the line again. Any good do-it-yourself book will offer advice on this simple test. If you are not a do-it-yourselfer, have the work done by someone who knows how to do the job.

Toilets: The toilet is one of the most common water waster but its leak tend to be less noticeable than faucet leaks. To determine if your toilet is leaking, look at the toilet bowl after the tank has stopped filling. If water is still running into the bowl, or if water can be heard running, your toilet is leaking.

Most toilet leaks occur at the overflow pipe or at the plunger ball inside the tank. To locate a toilet leak, take the tank lid off and flush. The water level should come up to about a half inch or so below the overflow pipe. Adjust the float level control screw, if necessary, so the valve shuts off the water at that level. If the valve itself is leaking, you may need a plumber to fix it.

Although water may not be seen or heard running, your toilet may have a silent leak. To test for a silent leak, drop a little food coloring into the tank. DO NOT FLUSH. Wait for about 10 minutes. If the food coloring appears in the toilet bowl, your toilet has a silent leak. It is probably located in or around the plunger ball or flapper valve at the bottom of the tank. These leaks are also easy to fix with parts from your hardware or home store.

Outside Taps: Check the outside taps for leaking water, particularly during the summer sprinkling season. A hose mistakenly left dribbling away in the grass or garden can waster thousands of gallons of water over the course of summer. Remember to close outside faucets tightly every time you shut off the water!

Posted in: Community, Conservation, Customer Information, From the Office, Leaks, Pine Cove Water District, Uncategorized, Water Conservation

Leave a Comment (0) →

Yes, you can… fix a leaky faucet by yourself

Does on of your faucets drip no matter how tightly you turn it off?

Does water leak out around the faucet handle when it’s turned on?

By following these few simple guideline, you can have a fault-free faucet.

Tools you may need:

  • A roll of 3/4-inch masking tape
  • 3-inch blade screwdriver (should cost about $2.00 )
  • 8-inch adjustable crescent wrench (should cost about $6.00)

Five steps to fix a faucet leak:

Before you start:

  • Wrap a couple of layers of masking tape around any shiny parts of your faucet that the wrench might touch and scratch. If you leave metal uncovered, there’s a good chance it will be dinged before you’re through.
  • If your problem i a leak around the handle when you turn on the water, follow steps 1, 2, and 3. On a faucet with a packing nut, cover it with tape and tighten it gently. Never overtighten this nut. If the leak persists, remove the nut entirely, replace the packing washer underneath, and reassemble the faucet.
  • To repair a leaky stem that has an O-ring, follow steps 1, 2, and 3. Pinch the O-ring on the stem to get a fingerhold, then pull it off. Replace with an exact match that has been lubricated with a little grease. Reassemble the faucet.
  1. Check whether the faucet is dripping hot or cold water. You may only have to fix one handle unit, not both. Then shut off the water supply valves beneath the sink. If they aren’t there of if they don’t work, turn off the master supply for the whole house. Turn on both faucets to let the water drain out.
  2. If there’s a decorative plastic button on top of each handle, just slip the blade of your screwdriver under the edge and twist. It should pop right off. Unscrew the screw underneath and pull or pry off the handle. Sometimes, because of the leak, corrosion makes it stick. Try wiggling it back and forth while prying upwards with the screwdriver blade. But never bang the handle free – the inner workings might break.
  3. What you see beneath the handle is called the stem. Fit your wrench to the large six-sided nut and loosen it. It may unscrew clockwise or counterclockwise, so if it doesn’t loosen one way, try the other. Then unscrew with your fingers until the whole stem lifts out of the faucet.
  4. On the bottom of the stem there’s a screw holding a rubber washer in place. Unscrew it, put in a new washer of the same size and replace the screw.
  5. Rub a little petroleum jelly on the threads of the stem. Then screw the stem back into place, tightening it with your wrench. Put the handle back on and turn on the water supply.

Posted in: Around the District, Community, Conservation, Customer Valve, From the Office, Pine Cove Water District, Uncategorized, Water Conservation

Leave a Comment (0) →

19 Painless Ways to Save Water

  1. Fix those faucet, toilet, showerhead leaks.
  2. Use the dishwasher and washing machine only with full loads.
  3. Don’t run water continuously for vegetable and dish washing.
  4. Don’t let the water run while brushing your teeth or shaving.
  5. Use a broom to clean driveways, walks, patio.
  6. Use a sponge and a bucket of water to wash the car.
  7. Take showers rather than baths, keep them, short.
  8. Don’t use the toilet as a trash can.
  9. Water the lawn in early morning or evening to avoid evaporation.
  10. Keep grass at least two inches high to shade roots.
  11. Aerate regularly, and use mulch to reduce evaporation.
  12. Plant native or drought-resistant grass and plants. Better yet, Xeriscape.
  13. Water trees slowly, deeply, infrequently, to encourage deep rooting.
  14. Don’t run tap to get cold water. Instead, keep a bottle in the refrigerator.
  15. Install aerators on bathroom and kitchen faucets.
  16. Install low-flow toilet (1.6 gal per flush)
  17. Install low-flow showerhead
  18. Insulate water heater and pipes.
  19. Ask PCWD, your water provider, for more water conservation ideas.

Posted in: Around the District, Community, Conservation, From the Office, Pine Cove Water District, Water Conservation

Leave a Comment (0) →
Page 4 of 45 «...23456...»